Battery switch on travel trailer function is crucial for managing your RV’s power. Understanding how your battery switch works—whether it’s a single, dual, or selector switch—is key to preventing dead batteries and ensuring a smooth camping experience. This guide dives into the various types of switches, their functionalities, troubleshooting tips, and essential safety precautions, equipping you with the knowledge to confidently manage your travel trailer’s electrical system.
We’ll cover everything from understanding the power distribution between your house and tow vehicle batteries to tackling common issues like corrosion and loose connections. We’ll also explore the interaction between your battery switch and other components like inverters, and offer advice on maintenance and upgrades. Get ready to become a battery switch pro!
Wiring Diagrams and Schematics
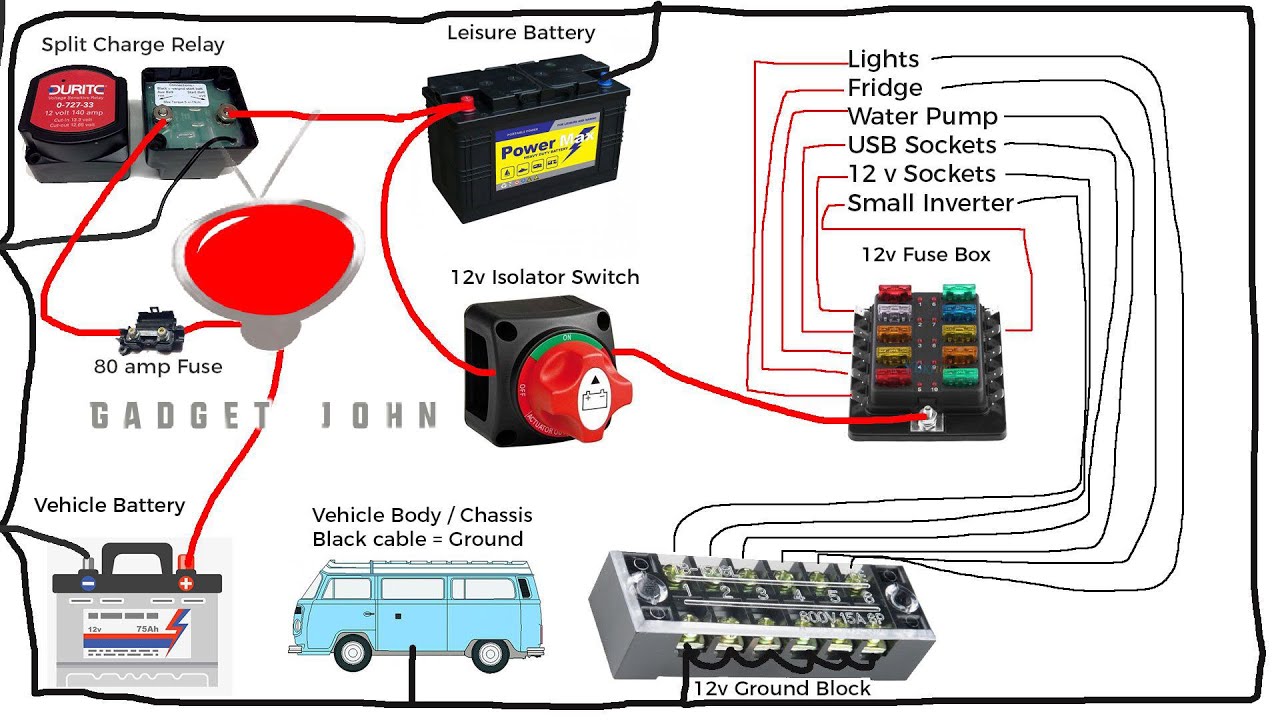
Understanding your travel trailer’s electrical system wiring is crucial for safe and reliable operation. A clear wiring diagram helps you troubleshoot problems and make informed decisions about upgrades or repairs. This section will illustrate a typical battery switch setup.A correctly wired battery switch allows you to isolate and control power to different parts of your trailer, preventing accidental discharges and maximizing battery life.
This is particularly important when you have both a house battery (for interior appliances) and a chassis battery (for starting your tow vehicle).
Typical Battery Switch Wiring Diagram
Imagine a simple diagram. At the top, you have your two batteries: the house battery (labeled “House Batt”) and the chassis battery (“Chassis Batt”). Each battery is connected to a large, heavy-duty wire. These wires lead down to a battery switch, a central component resembling a double-pole, double-throw (DPDT) switch. The switch has four terminals.
Two terminals are for the input from the house battery and the chassis battery, respectively. The other two terminals are the output terminals.From the output terminals of the switch, two more heavy-duty wires run to a distribution panel (labeled “Dist Panel”). This panel acts as a central hub, distributing power to various loads in the trailer. Loads might include lights (“Lights”), a water pump (“Water Pump”), and an air conditioner (“AC”).
So, you’re planning a trip? Awesome! Don’t forget travel insurance! Check out Aon travel insurance for comprehensive coverage. They’ve got options for everything from lost luggage to medical emergencies. Seriously, it’s a lifesaver. And if you want another option to compare, look into Aon travel insurance – they might have a plan that’s perfect for your trip.
Getting insured is just smart travel prep!
Each load has its own circuit breaker within the distribution panel.To illustrate further, imagine a line representing the positive (+) wire from the house battery connected to one input terminal of the switch. Another line, representing the positive (+) wire from the chassis battery, is connected to the other input terminal of the switch. The positive output terminals of the switch are connected to the positive bus bar in the distribution panel via heavy gauge wire.
Similarly, negative (-) wires from each battery connect to the negative bus bar of the distribution panel. This ensures a complete circuit for power to flow to all connected appliances. Remember, all connections must be secure and properly insulated to prevent shorts and potential fire hazards.
Upgrading or Replacing a Battery Switch: Battery Switch On Travel Trailer Function
Upgrading or replacing your travel trailer’s battery switch is a straightforward process that can significantly improve your camping experience. A faulty switch can lead to electrical problems, potentially leaving you without power when you need it most. Choosing the right replacement and installing it correctly ensures reliable power management for your appliances and accessories.Choosing the Right Battery SwitchWhen selecting a replacement battery switch, several key factors must be considered.
The most important is the amperage rating. This rating must match or exceed the total amperage draw of all your trailer’s electrical components. Underestimating this can lead to overheating and potential fire hazards. Consider the type of switch as well; a simple on/off switch is suitable for basic setups, while more sophisticated switches with multiple banks (for example, separating house batteries from starting batteries) offer greater control and flexibility.
Finally, consider the physical size and mounting style to ensure compatibility with your existing installation. A switch with clear, easy-to-understand labeling is also a worthwhile investment.Safe Removal and Installation of a New Battery SwitchBefore beginning any work, disconnect the negative (-) terminal of your battery to prevent accidental short circuits. This is the single most important safety precaution.
Once disconnected, carefully remove the old battery switch. Take note of how the wires are connected; taking pictures is highly recommended. The new switch should be mounted in the same location using the existing mounting hardware. If the mounting holes don’t perfectly align, use appropriate-sized washers or shims to ensure a secure and level installation. After mounting, carefully connect the wires to the new switch, matching the connections to those on the old switch (refer to your pictures and/or wiring diagram).
Always double-check your connections before reconnecting the battery.Connecting the New Battery Switch to the Existing Wiring HarnessConnecting the new battery switch to the existing wiring harness is crucial. Before connecting anything, carefully inspect the wiring harness for any damage or corrosion. Repair or replace any damaged wires. Each wire from the old switch should have a corresponding terminal on the new switch.
Use the same color-coding scheme, if available, to ensure accurate connections. Tighten all terminal connections securely using the appropriate tools. If you are unsure about the function of any wire, use a multimeter to identify its purpose. This step is crucial to avoid creating short circuits or other electrical problems. After completing the connections, reconnect the negative (-) battery terminal and test the new switch to ensure it functions correctly.
So, you’re planning a trip? Awesome! Don’t forget travel insurance! Check out aon travel insurance for comprehensive coverage. They’ve got options for everything from medical emergencies to lost luggage. Seriously, it’s a lifesaver. And if you need another option to compare, look at aon travel insurance – they often have different deals and packages.
Getting insured before you go is just smart planning!
Battery Switch and Inverter Interaction
Your travel trailer’s battery switch and inverter are key players in your off-grid power system, and understanding their interaction is crucial for reliable power. The battery switch acts as the main on/off control for your house batteries, while the inverter converts DC power from the batteries into AC power for your household appliances. Their relationship is fundamental to how your trailer uses stored power.The battery switch controls the flow of power from your batteries to the rest of your electrical system.
When the switch is OFF, power from the batteries is completely disconnected, preventing accidental drain. When the switch is ON, power is available to both the 12V DC system (lights, water pump) and, importantly, to the inverter. The inverter, in turn, draws DC power from the batteries and converts it to AC power, supplying 120V power to your AC appliances.
Therefore, the battery switch acts as a master control, determining whether or not the inverter can even access the battery power.
Inverter Operation with the Battery Switch OFF
With the battery switch in the OFF position, the inverter will not receive any power, regardless of whether the inverter itself is turned on. Attempting to run appliances will result in no power, preventing any unintended battery drain and protecting the batteries. This is a critical safety feature and a fundamental aspect of managing your power system. Leaving the battery switch OFF when the trailer is not in use is a best practice to conserve battery life.
Potential Issues from Incorrect Interaction
Incorrect interaction between the battery switch and the inverter can lead to several problems. For example, if the inverter is left on while the battery switch is turned OFF, it will draw no power, but may still consume a small amount of parasitic power, potentially draining the batteries over time. This is a relatively minor issue, but neglecting to turn off the inverter could shorten its lifespan.
A more significant issue arises if the battery switch is left ON while the trailer is unattended for extended periods. A malfunctioning appliance or a constantly running parasitic load could fully drain the batteries.
Best Practices for Managing Battery Switch and Inverter, Battery switch on travel trailer function
Always turn OFF the battery switch when the trailer is not in use or when you’re not actively using the inverter. This is the single most important step to prevent accidental battery drain. Before turning on the inverter, ensure the battery switch is ON. Regularly check your battery levels to ensure proper function. Consider using a battery monitor to track battery voltage and amperage, providing a clear picture of your power consumption and battery health.
This proactive approach helps to avoid unexpected power outages and battery damage.
Mastering your travel trailer’s battery switch is a game-changer for any RVer. By understanding its function, performing regular maintenance, and knowing how to troubleshoot problems, you’ll avoid frustrating dead batteries and ensure a reliable power supply on all your adventures. Remember safety first—always disconnect the battery before working on the switch. Happy camping!
Answers to Common Questions
What happens if I leave my battery switch on all the time?
Leaving your battery switch on constantly can drain your house batteries, especially if you have parasitic draws from devices left plugged in. It’s best to turn it off when not using the trailer for extended periods.
How often should I clean my battery switch?
Inspect your battery switch at least every six months and clean it as needed. More frequent cleaning is recommended in humid or corrosive environments.
Can I use a different type of battery switch than what came with my trailer?
Yes, but ensure the replacement switch has the correct amperage rating and wiring configuration for your system. Consult a qualified electrician if unsure.
My battery switch is making a clicking sound. What’s wrong?
A clicking sound could indicate a faulty switch, loose connections, or a low battery voltage. Check connections first, then consider replacing the switch if the problem persists.
